The .condarc file is a configuration file for Conda, a cross-platform, language-agnostic binary package manager. .condarc lets you configure various aspects of Conda, such as the channels to search for packages, the location of the Conda environments, proxy settings, and so on. It is often located in the user’s home directory, but its location can vary based on the operating system or if a particular environment variable (CONDARC) is set.
:warning: You can use the conda config command to modify the settings in the .condarc file. It’s important to note that changes to the .condarc file can significantly affect how Conda operates, so it should be edited with care.
.condarc Location on Windows
Location of .condarc
You can see the location of your .condarc file by running this command:
conda config --show-sources
What is .condarc?
.condarc is a configuration file used by Conda to store user-defined settings. It allows you to customize various aspects of Conda’s behavior, such as package channels, proxy settings, and environment configurations.
As for a summary:
.condarcis a configuration file for Conda.- It allows you to modify various aspects of Conda’s behavior.
- It’s typically located in the user’s home directory, but can be elsewhere depending on your operating system and environment settings.
- The
conda configcommand can be used to edit the.condarcfile.
Channels
- Channels are the locations where Conda looks for packages.
- They can be set in the
.condarcfile using thechannelskeyword.
channels:
  - defaults
  - conda-forge
  - bioconda
  ````

### .condarc Location on Windows
On Windows, the .condarc file is typically located at:
```bash
C:\Users\<username>\.condarc
- Note: username should be replaced with your actual username.

.condarc Location on macOS and Linux:
On macOS and Linux, the .condarc file can be found at:
~/.condarc
- Note: The tilde (~) represents your home directory.
How to customize the .condarc File
To make changes to the .condarc file, you can use a text editor of your choice. Here are a few key configurations you might find useful:
Channels:
Channels determine where Conda looks for packages. Here’s an example of adding a channel to your .condarc file:
channels:
  - defaults
  - conda-forge
In this example, both the “defaults” and “conda-forge” channels are listed.
SSL Verification
SSL verification can be turned off in the .condarc file.
However, it’s generally not recommended for security reasons.
ssl_verify: false
Environment Directories
You can set the location where Conda environments are stored.
envs_dirs:
  - /opt/conda/envs
Editing the .condarc file
The .condarc file can be edited directly, or through the conda config command.
conda config --add channels conda-forge
This command would add the conda-forge channel to your .condarc file.
Proxy Settings:
If you’re behind a proxy, you can configure Conda to use it. Here’s an example of adding proxy settings to your .condarc file:
proxy_servers:
  http: http://<proxy_host>:<proxy_port>
  https: https://<proxy_host>:<proxy_port>
Replace
proxy_servers:
    http: http://proxy.corp.com:8080
    https: https://proxy.corp.com:8080
Environment Configurations:
You can define default configurations for newly created environments. For example, specifying the default Python version or including specific packages upon environment creation. Here’s an example:
env_create:
  - name: my_env
    python: 3.9
    dependencies:
      - numpy
      - pandas
In this example, a new environment called “my_env” is created with Python 3.9 installed along with the NumPy and Pandas packages.
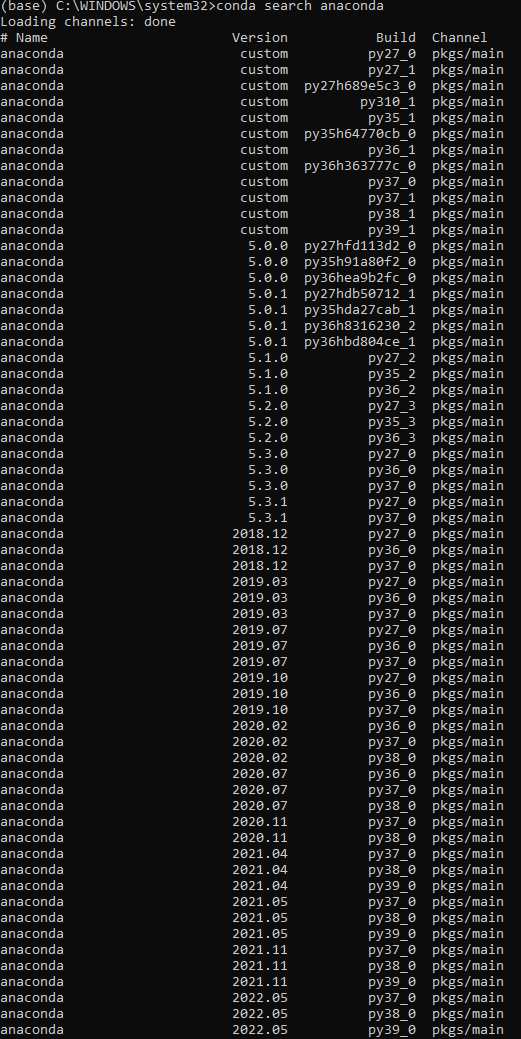
Find Anaconda version to use when installing a package
You can explicitly specify the anaconda version you prefer when you get conflicts during the installation of a package.
First and foremost, search the different version of anaconda targeted by your defaults channels:
conda search anaconda
Output:
So Now, for example, instead of:
conda create -n name Python=2.7
you can write this:
conda create -n name Python=2.7 anaconda==5.3.1 -y
For More details see here.
Activate Conda Environment from Powershell
In order to get access to conda from Powershell, you need to make additional configurations, i.e., enable unrestricted Powershell script execution:
1. Open Windows Powershell
2. Assuming your Anaconda or Miniforge is installed at C:\ProgramData\miniforge3, write:
powershell -ExecutionPolicy ByPass -NoExit -Command "& 'C:\ProgramData\miniforge3\shell\condabin\conda-hook.ps1' ; conda activate 'C:\ProgramData\miniforge3' "
- Then write
conda activate <my-env>
Output:
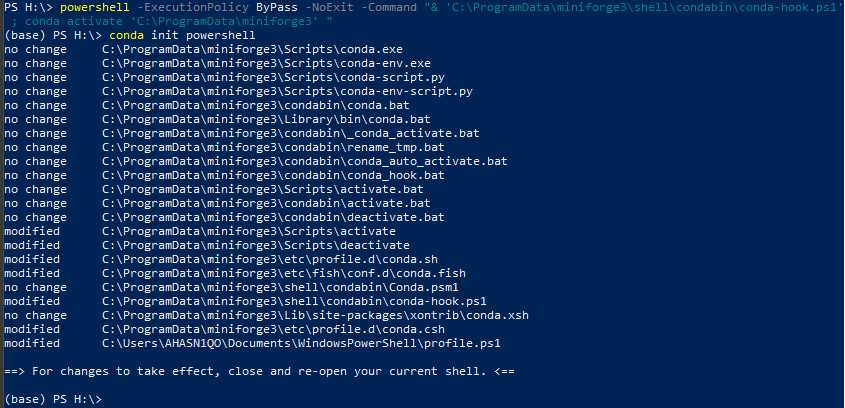
- Now, you just have to cloase and reopen your powershell CLI.
You should now be able to activate environment with:
conda activate <my-env>
[…] .condarc Location […]
[…] .condarc Location […]
[…] .condarc Location […]